Thursday, October 10, 2013

Sweet Potato & Apple Soup

Hello, spider.

A Halloween surprise on my porch.


It's October, month of spiders, ghost stories, mysterious moons. Mysterious rocks, too, found in the crotches of trees:


"Mommy, WHAT THE."

Fear. Mystery. The unknown, stony heart. October.

Also, October gives us chilly mornings, chilly evenings. So I start to think: apples. And: soup.

I came up with this recipe when I realized that 1) it was chilly enough for soup; and 2) roasted apples and sweet potatoes were good together, so I bet they would be good pureed together.

I was right. 

This soup is very simple: chop and roast some onion, sweet potato, and apple, then puree the roasted stuff with some water. You don't even need that much seasoning. And if you roast everything in advance, you can make this soup in under 10 minutes

Sweet Potato & Apple Soup

You can add a squeeze of lime at the end if you like, but the simplicity of these flavors is also amazing all on its own. 

2 medium sweet potatoes, peeled and diced
1 medium-to-large apple, peeled and diced (local is best!)
1 small onion, peeled and diced
A few glugs of olive oil
some salt and pepper
some water
dash of cayenne

Preheat oven to 400 degrees. 

On a large baking sheet or roasting pan, combine the diced sweet potatoes, apple, and onion with a few glugs of olive oil, making sure everything is thoroughly coated. Sprinkle with salt and pepper. 

Roast for about 20 minutes, stirring once or twice, or until tender and beginning to caramelize. Remove from the oven, and turn the oven off. 

Put the roasted mixture in a stockpot, and add just enough water to cover (I used about 2 1/2 cups). Bring to a simmer and cook, stirring often, for about 5 minutes. Add a dash or two of cayenne. 

Puree the soup with an immersion blender until very smooth. Taste and adjust seasonings.

Take it to work.


Sunday, September 8, 2013

Three Sisters Skillet

Fall is my favorite cooking season. Apples, pears, squash, chestnuts. Plus, well into the season, leftover summer harvests of corn and beans and tomatoes and greens.

Beans, corn, and squash are known in the Americas as the "three sisters." I've always liked the combination, and I love the name. I come from a family of three sisters. Whenever I make three-sisters anything, I think about my own sisters, how we are so unique and different and very much ourselves, and yet we go well together.

Don't ask me if Rebecca or Christina is the butternut squash, if I am the spicy corn, or who is a bean.

Point is, you should make this skillet, especially if, like me, you love the gorgeous colors of fall, the flavors of fall, the autumnal smells and sounds and scurrying squirrels.

Three Sisters Skillet.

Three Sisters Skillet

I had some leftover Spicy Corn, so that's what I used. If what you have is plain-old corn, I'd suggest adding some diced chiles, a bit of minced garlic, and some extra seasoning to this skillet. 

Make this in a deep, wide skillet with high sides. It's kind of like a skillet-stew. And feel free to add complementary flavors, such as diced apple, onion, red bell pepper. 

1 large butternut squash, peeled, chopped and roasted*
1 1/2 cups cooked red kidney beans (or one can, drained and rinsed)
2 cups Spicy Corn (or 2 cups of plain corn kernels, plus some diced chile and S&P)
salt & pepper to taste
Cooked white rice

*To roast the squash: coat the chopped squash with a good amount of olive oil, I'd say at least 1/4 cup, plus some salt and pepper. Roast on a parchment-lined cookie sheet in a 400-degree oven, stirring occasionally, for about 30 minutes, or until tender and golden brown. 

Put everything except the rice into the skillet, and heat over medium-low heat, stirring often, for about 15 minutes, or until steaming and flavorful. Add small amounts of water if things start looking dried-out like autumn leaves. 

Serve over rice. That's all! 

Look, mom, the leaves are beginning to turn!


Wednesday, September 4, 2013

Spicy Corn

The best decision I made this year, food-wise, was to plant fresh chiles.

Refreshing chiles in ice water. 

I harvested so many last week that I have been giving them away. I harvested so many that I have been using them in and on everything I eat. I harvested so many that I had to refresh them in ice water this evening, before using a bunch in this spicy corn and then roasting the rest.

I warn you, people: you probably want to step off. I have been eating jalapeno-stuffed olives, stirring diced fresh chiles into hummus, sprinkling them on everything, breakfast, lunch, and dinner. My mouth is constantly on fire, which is how I like it. 

You do not want to get near this. 

If you grow and harvest and eat fresh chiles, be prepared for dragon breath. If your lover picks on you for it, dump 'em. They don't love you.*

Diced fresh chiles.

Tonight, I decided to finely dice a bunch of mixed chiles--four or five jalapenos-and-whatever-the-other-long-skinny-chile-is--and make some spicy corn.

Corn cut fresh off the cob. 

I cut the kernels off of five ears, tossed them with the diced mixed chiles, added salt and pepper and a few good glugs of olive oil, and stuck it all under the broiler.


Fresh corn & chiles: a perfect couple. 

I broiled the corn-and-chile mixture for 10 or 15 minutes, stirring often. When I decided it was done, it was pocked with brown spots and smelled like heat. Spicy heat. My eyes stung. My lungs burned.

Step off. 

I then squeezed the juice of a fresh lime over everything, sprinkled it with sliced scallion, and stuck it all on a few tostadas with some black beans and salsa verde (yes, more heat). 

I was going to call this "salsa," or "salad," or "side dish." But it's really all of those things, or none of them. It's whatever. This is simple summer food, from the garden and the farmers' market, that sets your mouth afire and makes your tummy happy. 


*Disclaimer: this is not a blog that purports to give relationship advice--wise or otherwise--except sometimes about you and your dog.


Hot dog. 

Tuesday, August 6, 2013

Two Pizzas

Pizza is something I miss being able to order and have delivered right to my doorstep for dinner.

There are gluten-free frozen pizzas you can buy, but they are expensive, tiny, and undelicious. 

Do you miss pizza? people ask me. Duh. Of course! 

Sob. 

But I have ways of dealing with the loss. I am not sobbing into my sheets every day. I have learned some things in this life. 

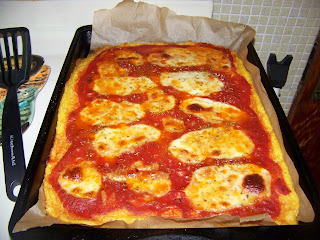
Polenta pizza with fresh mozzarella.

Such as: traditional cuisine has many gluten-free flatbread options: socca, polenta, dosas. They are delicious, and what is pizza if not flatbread topped with stuff?

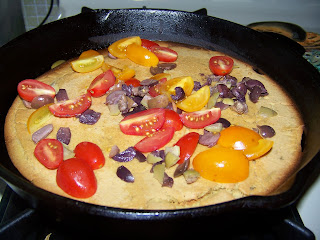
Socca topped with mixed tomatoes and olives. 

Here are two pizza recipes, one with a polenta crust and fresh mozzarella, the other vegan, with a socca crust topped with mixed tomatoes and olives.

Polenta Pizza with Fresh Mozzarella

Dress this baby up any way you want: with or without the cheese; with sauteed mushrooms; with fresh basil and huge heirloom tomato slices. It's your pizza. 

2 1/2 cups water
1 cup coarsely ground gluten-free cornmeal
2 tbsp olive oil, plus more to grease the pan
salt & pepper
pizza sauce, marinara sauce, or a can of fire-roasted diced tomatoes, drained
fresh mozzarella
fresh or dried herbs, such as basil, oregano, thyme, crushed red pepper, etc.

Bring the water to a boil, with a pinch of salt, in a saucepan. Slowly whisk in the cornmeal, being sure to whisk constantly until the mixture thickens into a batter-like consistency. Turn the heat to low, and cook, stirring very often, for about 15 minutes, until thickened but still stirrable. (Is that a word?) Stir in the olive oil. 

Preheat the oven to 400 degrees. Line a 9 x 13 inch cookie sheet (with sides!) or pizza pan with parchment paper, and drizzle olive oil over the parchment. Pour the cooked polenta into the prepared pan. When it has cooled, cover the top with more parchment paper and spread it out with your hands until it is about 1/2 inch thick all around. Sprinkle with salt and pepper. 

Top with sauce, fresh mozz, and herbs. Bake for 15 minutes, or until browned and crispy. 


Socca with Mixed Olives and Tomatoes

You can add parmaggiano-reggiano cheese to this, too, if you're not vegan. 

1 cup chickpea flour (also called besan)
1 1/4 cup water
2 tbsp olive oil, plus 1 tbsp for the skillet, plus more for drizzling
salt & pepper (LOTS OF PEPPER)
1 tbsp fresh rosemary, or 1 tsp dried and crushed in a mortar & pestle
mixed tomatoes and mixed olives, chopped

Whisk the chickpea flour with the water and olive oil until blended. Whisk very well to avoid lumps. You may also wish to sift the chickpea flour into the water using a fine-meshed sieve; this will help you avoid the lumpiness. Add a bunch of salt and pepper (lots of pepper, folks!), whisk again, and let this mixture sit at room temperature for at least an hour. 

When ready to make the socca, preheat the oven to 450 degrees. Put 1 tbsp of olive oil in a well-seasoned cast-iron skillet and make sure it covers the whole bottom. Whisk the rosemary into the socca mixture, then pour it into the prepared skillet. Drizzle with more olive oil! More! More!

(Note: you can add the chopped olives right into the batter, too. But not the tomatoes.)

Bake for 12 to 15 minutes, or until browning and crispy around the edges. Remove from the oven, drizzle with more olive oil, and top with the mixed tomatoes and olives. 

This won't taste like chain-delivery pizza, but it will taste delicious. 


Friday, August 2, 2013

The Julie Scramble

Perhaps the only bright side to a friend moving across the country is that she will give you many bottles of wine, houseplants, and sweet potatoes before she goes.

This scramble is named for such a friend. 

The Julie Scramble. (SOUNDS LIKE A DANCE MOVE)

I diced up one of Julie's sweet potatoes, roasted it in olive oil, salt, and pepper, and added it to a tofu scramble that includes a bunch of Swiss chard just picked from my garden and a handful of locally grown tomatoes. 

I did not drink any of the wine with it, because BREAKFAST. But when I eat the leftovers for dinner, I will pair them with Shiraz. (Maybe you will drink the Shiraz at breakfast. Who am I to judge?)

I like to make tofu scrambles in a well-seasoned cast-iron skillet. The tofu will brown on high heat, and you scrape up the browned bits from the bottom for great flavor. This is harder to do--both the browning and the scraping--with a stainless-steel or nonstick pan. 


Cast iron is your friend. Not as cool a friend as Julie, but still: a friend. 

The Julie Scramble

It has been nice and cool here, so I didn't mind turning on the oven to roast the sweet potatoes. But you could also pan-roast them if you'd rather. 

1 medium sweet potato, from a friend or not, diced
1 tbsp olive or coconut oil
salt and pepper

1 tbsp olive or coconut oil
1 small to medium onion, diced
1 block extra-firm tofu (be sure it's gluten-free), squeezed dry in a clean towel
1 tsp turmeric
salt and pepper
1 bunch Swiss chard, from your garden or not, coarsely chopped
1 handful cherry or grape tomatoes

First, roast the sweet potatoes. Combine the diced sweet potatoes with the oil and S&P, and roast at 400 degrees for about 15 minutes or until tender.

Next, make the scramble. Heat the oil in a cast-iron skillet over medium-high heat. When the oil is hot, add the onion and saute for about 7 minutes, or until tender but not browned. Crumble the tofu right into the skillet with your hands (squishy!), then add the roasted sweet potatoes, turmeric, and S&P, and cook for about 10 minutes, stirring once in a while to scrape the browned bits of tofu from the bottom of the pan. When the scramble is golden brown and smelling delicious, add the chard and tomatoes, stir well, and cook for another minute or two, just until the chard is wilted and the tomatoes are warm. Taste and add more S&P (or even hot sauce) if you like. 


Breakfast, lunch, or dinner. 

Enjoy! Oh, and Willa would like to say "see you soon!" to her hiking buddy. (She doesn't believe in goodbyes.)


See you soon, Julie!


Sunday, June 2, 2013

Blueberry-Lime Compote

This is my very favorite expression of Willa's. (These are all from the same hike. She checks on me often.)

C'mon, mom!

You there?

Still there?

This is my very favorite bowl. It's a family heirloom from my mom. I have several of these little ones, and one gigantic one too. 

Beautiful blueberry bowl.

Blueberries are my very favorite fruit. Usually I just eat them plain, but I had a pint that was a few days old (berries don't last long!), so I decided to make a compote. 

Compote = stewed fruit. 

Compote is delicious on gluten-free pancakes, oatmeal, toast, or crackers. It's also yum inside a rice-flour crepe, dusted with cinnamon. Or on ice cream.

Blueberry-Lime Compote

1 cup fresh or frozen blueberries
1/4 cup water 
1/4 cup sugar (or to taste)
juice of one lime (or to taste)
1 tsp cornstarch

Put the blueberries, water, and sugar in a small pot or skillet. Turn the heat to medium-low and bring to a simmer. When simmering, add the lime juice and sprinkle the cornstarch evenly overtop everything. Mix well, turn the heat to low, and simmer for 10 to 15 minutes, until thickened to your preferred consistency. 

That's it! Enjoy berry season!

You might just eat it right from the bowl.


DORKFACE


Monday, May 27, 2013

Paprika-Pepita Potato Salad

I made this up in the spur of the moment, after two days of stripping wallpaper, which left me both unable to do my normal grocery shopping and very, very hungry. I had some potatoes. Some smoked paprika. Some pepitas. So.

Here you go.

Vegan picnic food won't spoil in the sun. 'Cuz it's tough like that. 


Paprika-Pepita Potato Salad

serves 1 or 2

Boil 1 pound of baby yukon gold potatoes for about 15 minutes, until fork-tender but not mushy. Cool. 

When the potatoes are cool enough to handle, chop them and put them in a bowl. Add 1/4 cup diced onion, 1 diced carrot (I have no celery! WTF!), 1/3 cup Vegannaise, 1 tbsp gluten-free dijon mustard (or less if you're not as weird as me), and 1/2 tsp sweet smoked paprika, and mix everything up. Add salt and pepper to taste, and serve topped with more smoked paprika and a sprinkling of pepitas.

(Of course, if you have celery like a normal person, you should add some! Also pickles, red pepper, capers, olives. I have no olives! WTF!)

No celery? No olives? Ha ha ha!

Sunday, April 21, 2013

Apple Curry

I had some leftover apples I needed to use up this weekend, so I made up a simple apple curry. 

Apple Curry, 2013.

When I was much younger, I made a dinosaur out of clay. My mom recently gave it to me, and now it sits on the mantle in the dining room. I have a vivid memory of taking the side of a popsicle stick and pushing it gently into the clay to make the mouth.


My dinosaur, circa 1982.

I even gave my dinosaur a signature:

That's me.


I've been meaning to try an apple curry for a while now, and I felt a similar sense of accomplishment as when I had sculpted the dinosaur in grade school. This recipe is all mine.


The dinosaur approves. 


Apple Curry

People: try not to overcook the apples! They should be soft but still firm. Cook too long and you will have curry applesauce (which actually sounds delicious. Maybe you should do that).

1 tbsp olive oil
1 onion, chopped
4 tart apples (I used Granny Smith), peeled, cored, and chopped
pinch of salt
1 tsp minced chipotles in adobo, or more to taste
2 tsp curry powder, or more to taste
1/4 tsp black pepper

Heat the oil in a deep skillet over medium-high heat. Add the onion and cook, stirring, until soft but not browned (lower the heat if necessary), about 7 minutes. Stir in the apples along with a pinch of salt. Sprinkle the chipotles, curry powder, and pepper over everything, stir well, and lower the heat to medium-low. Cook, stirring, about 8 minutes, until the apples are al dente (soft but not mushy).

Enjoy with a side of cooked brown rice or quinoa.


Simple.


Sunday, April 7, 2013

Green Giant Salad

I love salad!

A rainbow of green.  

I learned how to make hearty salads from my mom. (Hi mom!) She throws everything she has--greens, chopped veggies, fruit, nuts, and cheese--into a big bowl and serves it up. When I go out to a restaurant and get a salad with only lettuce and tomatoes in it, I think what is this??? To me, salad is a big, meal-sized endeavor full of different flavors and textures. 

This one is definitely filling enough for lunch or dinner, especially if you eat it with a side of homemade hummus (recipe coming soon). It's all-green in honor of spring: lettuce, broccoli, zucchini, peas, pistachios, and--my favorite--avocado.

Dinner. 

Green Giant Salad

2 cups broccoli florets, lightly blanched in salted water
4 cups chopped romaine lettuce
1 cup thawed frozen peas
1 small zucchini, sliced thinly
1/3 cup toasted pistachios
gluten-free salad dressing of your choice (here's mine)
1 avocado, sliced

Combine all the ingredients in a salad bowl and toss with some dressing. Add the avocado just before devouring. 

C'est tout!


Saturday, April 6, 2013

Peanut Butter Ice Cream

I am aware that it is only April and many of you still have snow. An ice cream recipe might seem overly optimistic. But here in Cincinnati, it is 60 degrees and sunny! Perfect hiking weather.

And perfect ice cream weather? Maybe not, but I couldn't wait.

Vegan ice cream. No ice cream maker needed!

Okay, so technically this is probably more "smoothie" than "ice cream." But really, what's the difference?

One difference is that this is some pretty healthy stuff. Ingredients: frozen banana; peanut butter; almond milk; vanilla extract. No sugar, no eggs, no dairy. And really delicious, too, especially if you are a major peanut butter fan like me.

Stick some stuff in a blender, and you're done.

Peanut Butter Ice Cream

1 banana, frozen and in chunks
1/2 cup peanut butter (I use sugar-free)
1/2 cup almond milk
dash of gluten-free vanilla extract

Put all the ingredients in a blender or food processor and pulse a few times. Stir, then puree until nicely blended. Some chunks are allowed, but I prefer mine nice and smooth.


Eat with a spoon.

Happy spring!!


Willa bathed in light.

Sunday, March 3, 2013

Fragrant Spring Cleaning & Cashew Curry

Happy March!

The veggies in this curry are just barely cooked, leaving them crisp and flavorful.

It has been a rough couple of months for me and Willa: I was sick throughout the month of February, so poor Willa didn't get many hikes. We spent a lot of time sleeping on the couch and drinking ginger tea. But I'm better now, back to cooking, back to hiking. Looking forward to spring.

Shadows on the path.

This weekend, I started my spring cleaning. I make most of my own cleaning products homemade, out of baking soda, citrus fruits, salt, and other household staples. I started doing that years ago for environmental reasons--all of the ingredients are safe and non-toxic for humans and animals--but I later found out how cheap it is. And fun! By switching up the ingredients you use, you can make your house smell like anything: lemons, oranges, peppermint tea, lavender. Probably not chocolate. (Though a splash of vanilla extract makes things smell like cookies!) Maybe this doesn't make spring cleaning completely awesome, but it does make it aromatherapeutic. :)

I will be posting some recipes for homemade cleaning solutions in the weeks to come. Today I give you a basic recipe for wood floor cleaner, and an all-purpose spray solution you can use on your countertops, stovetop, etc. 

Lemon-Peppermint Wood Floor Soap

1/8 cup natural dish soap
1/2 cup freshly-squeezed lemon juice
1/2 cup brewed peppermint tea
2 gallons warm water

Combine ingredients in a bucket, and use a mop or rag to scrub your wood floors clean!

Almond-Orange All-Purpose Cleaner

1 tsp Borax
2 tbsp freshly-squeezed orange juice
1 or 2 drops almond extract
2 cups very hot water
spray bottle

Combine ingredients in a spray bottle, and shake well for a minute or so. Spray and clean all of your surfaces!* (Always shake the solution again before use.) 

*though obviously not upholstery.

Now back to food recipes, though I can't take credit for this one. Today I made this cashew curry from 101 Cookbooks, a site that I love. It's not the normal way I make curry--the vegetables here are lightly simmered in curry-spiked coconut milk, and are left barely cooked. The curry is therefore very light, despite all the filling ingredients: tofu, cauliflower, green beans, and of course freshly-toasted cashews. 


The pictures on 101 cookbooks are better.
But isn't there something  charmingly honest about my crappy photos?

Enjoy. I'll be back to posting my own food recipes soon. Also, I have a thing or two to say about Emily Dickinson.

Sunday, February 3, 2013

Ginger Applesauce

I never buy jarred applesauce because, let's face it, it's tasteless. Or it's super sugary.

Homemade applesauce is so much better. Plus, you can customize it to your taste.

Appley. 

Today I bought a big pile of apples and set out to make a basic homemade applesauce. At the last minute, I decided to throw in some grated fresh ginger. Ginger is warming, and it is cold out there.

One of these days, I want to experiment with a savory applesauce, adding celery root, onions and some savory seasonings (curry?). I will let you know how it goes.

This recipe is based on my mom's awesome applesauce, which she made for me and my sisters all the time when we were kids. (Hi, mommy!)

Did somebody say APPLESAUCE???


Ginger Applesauce

Making applesauce is a lot like making mashed potatoes. You peel and chop the apples, cook them in water to cover until tender, and then mash with some seasonings.

Here, I cook the apples with lemon juice, a cinnamon stick, and the grated ginger. Then I mash them by hand, with a potato masher, adding a bit more cinnamon (ground), some maple syrup, and a dash of cayenne.

Mashing them by hand leaves the sauce a bit chunky, which is how I like it. By all means, if you like yours smoother, use an immersion blender to puree yours.

6 medium apples, peeled, cored, and chopped
water just to cover
juice of 1 lemon
1 tsp grated fresh ginger
1 cinnamon stick
1/2 tsp ground cinnamon
1 or 2 tbsp maple syrup (to taste)
dash of cayenne (optional but highly recommended)

Put the chopped apples in a large pot with water to cover. Add the lemon juice, ginger, and cinnamon stick, and bring to a boil. Stir and turn the heat to low. Allow to simmer for 15 or 20 minutes, until the apples are soft and mashable.

Using a fine-meshed strainer (so that you don't lose the ginger), drain the apples and discard the cinnamon stick. Return the apples to the pot, add the remaining ingredients, and use a potato masher to mash the applesauce to your liking. Taste and add more cinnamon or maple syrup if you like.

Eat it warm, eat it cold, eat it at room temperature.

Like mashed potatoes, but with apples. 


Sunday, January 27, 2013

Beans & Rice, Today's Way

I've always thought "Beans & Rice" to be a rather dull name for a stellar meal.

Today's combination: pinto beans, white rice, crushed coriander.

This is less a recipe than a technique. Beans & Rice is such a staple for me, I make it literally dozens of ways. It depends on what I have in the house. Sometimes it's spicy black beans with brown rice, topped with diced avocado and a squeeze of lime. Sometimes it's red beans with white rice, carrots, and bell peppers, garnished with sliced green onions. Many times I add coconut milk (not today) or finish the dish in the oven (not today).

Sautee some onions and celery.

Today, I had dried pinto beans, Arborio rice, onion, celery, garlic, and a can of tomatoes. If I had had them, I would have added carrots, which make any bean dish sweeter and more colorful. But I didn't. So I worked with what I had. (There is a life-lesson in this, methinks. But this is a cooking blog, so I will leave you to your own reflections.)


Crushed coriander and other spices make things yummy.

I always have vegetable stock and a variety of spices in the house. And as long as I have some aromatics (at least an onion), some beans (canned or dried), and some kind of rice, I can make this--without having to grocery shop!--in almost no time. It's cheap, delicious, filling, and healthy. You can eat it as is, stuff it into tortillas, or use it as a dip for corn chips.

With dried beans, it takes a couple of hours to make Beans & Rice. With canned beans, I can make it in 40 minutes.

The flavors are saying their vows!


Beans & Rice, Today's Way

The key to a good Beans & Rice dish is the seasoning. Especially if you're using dried beans (which I recommend, if you have the time), you need to add quite a bit of salt. Lots of black pepper and crushed red pepper flakes. Cumin, oregano. And here, the star seasoning is crushed coriander seeds.

I don't bother soaking dried beans anymore; I just cook 'em until they're done. But you can soak yours if you want. It will cut the cooking time a bit.

2 cups gluten-free vegetable stock
1 cup Arborio rice (or whatever rice you have)

1/2 lb dried pinto beans
1 tsbp vegetable oil
1 onion, chopped
5 celery stalks, chopped
2 cloves garlic, minced
2 tsp coriander seeds, crushed in a mortar and pestle
1 tsp dried cumin
1/4 tsp crushed red pepper (more or less to taste)
at least 2 tsp salt, plus more for cooking the beans, and lots of black pepper (to taste)
1 14-oz can whole or diced tomatoes, with juice

Cook the rice, using half of the vegetable stock, in your usual way. (I use less water than most package instructions recommend; I like my rice al dente, not mushy.)

Cover the beans with several inches of water and bring to a boil. Reduce the heat, partially cover, and cook until tender, about 1 hour to 90 minutes. Add a huge scoop of salt near the end--I use probably a tablespoon. Taste a bean every now and then to ensure you don't overcook them. Mushy beans are not good beans.

When the beans are nearly done, heat the oil in a cast-iron pot (I use a Le Creuset) or large skillet with deep sides. The heat should be medium-high. Add the onions and celery and saute, stirring, for about 8 minutes, or until tender and translucent. Add a heaping teaspoon of salt and some pepper. Then add the garlic and stir for another minute. Add the crushed coriander seeds, cumin, crushed red pepper, and some more salt and pepper, and stir for 30 seconds or so. Things should smell very fragrant!

Add the tomatoes, breaking them up with a wooden spoon right in the pot if they are whole. Add the beans and, if things look too dry, a little bit of the water you cooked the beans in. Or add more stock. Stir everything well, lower the heat, and simmer for 30 minutes or until--as they say--the "flavors marry." Taste, and adjust the seasoning (you will likely need to add more salt).

By now your rice should be done. Serve the soupy beans over the rice, and eat them up.

A stellar meal.